Getting started
Signing in and the interface
The program opens in a browser at the address given by the administrator. On the sign-in page enter your login and password; the interface language is chosen on the sign-in page and at the bottom of the menu.
The menu of sections is on the left: Work (My work, Issues, Board, Backlog and sprints, Projects, Search), Wiki, Reports (Dashboards, Logged time, Issue completion, Teams and departments) and Settings. The set of sections depends on your roles. Every section and every card opens in a tab above the work area; tabs can be switched and closed.
The bell icon in the menu shows notifications about events in your issues.
My work
My work is a personal dashboard that is created automatically: open issues, overdue issues, work done in the period, logged time, the list of your issues, distribution by status, issues due in the next few days, time by day. The Configure button opens the dashboard settings (see Dashboards).
Issues
Issue list and query string
Issues shows the issues selected by the query string, a filter over the list. By default the string is resolved is empty (unresolved issues). Change the string and press Enter or click Search.
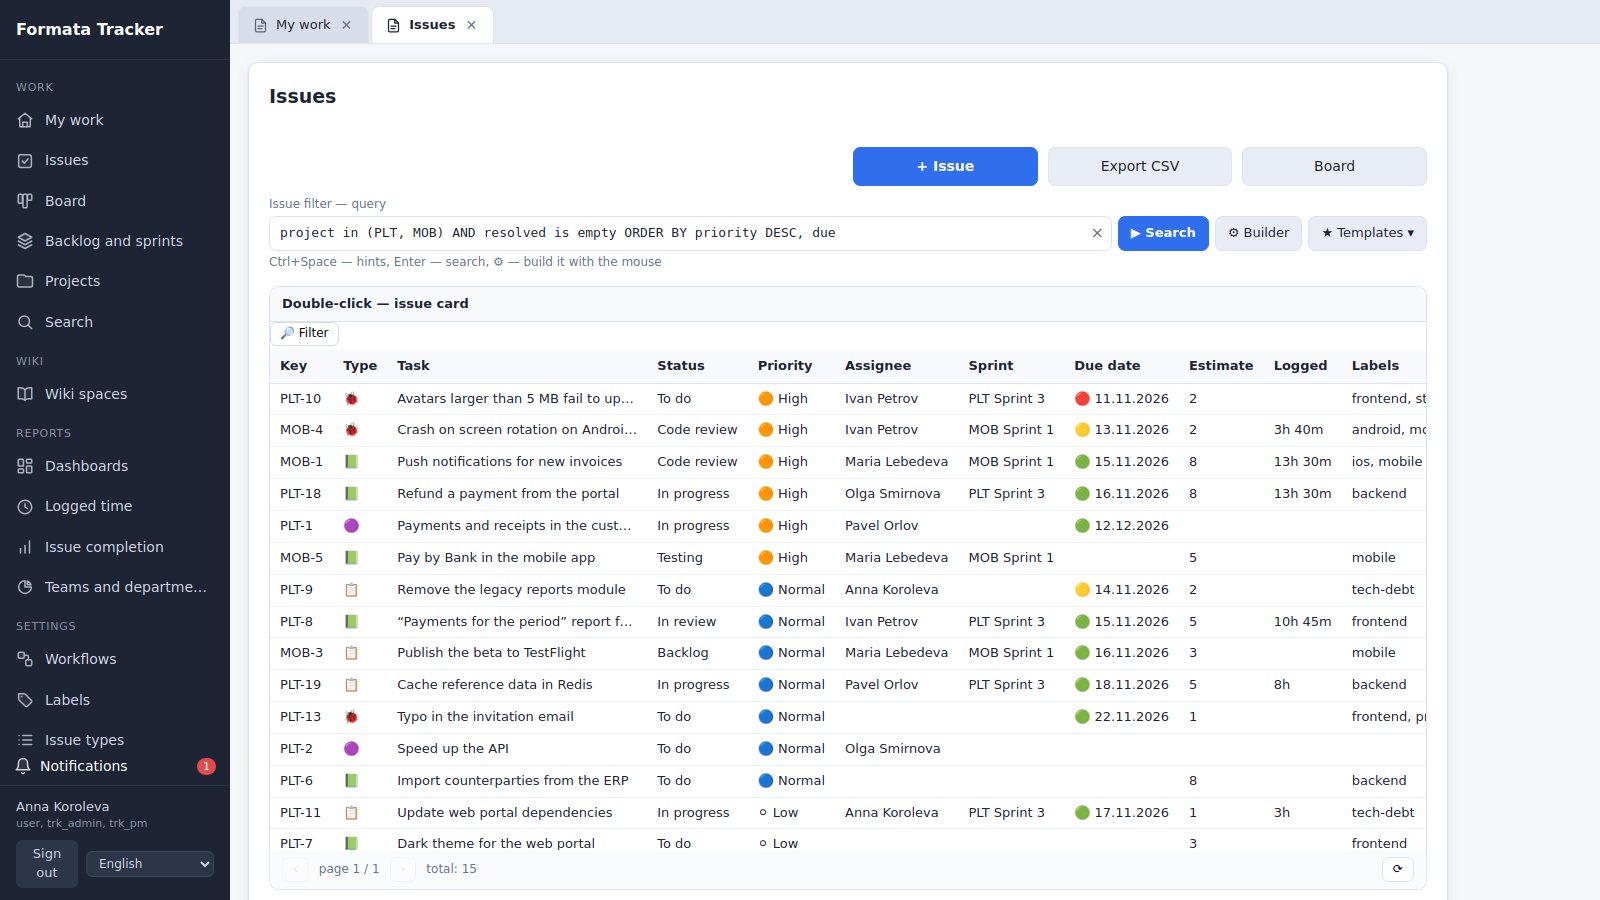
The string consists of conditions of the form "field operator value", for example assignee = me() or priority >= high. Conditions are joined with AND (both conditions) or OR (any of the conditions); NOT negates a condition; brackets change the order of evaluation. Conditions written one after another without a connective are joined with AND. Sorting can be added at the end of the string: ORDER BY due, priority DESC.
Words without an operator are searched for in issue titles and descriptions: the string payment "refund" finds issues that contain both expressions. An issue key (PLT-12) finds the issue itself.
Examples:
| Query string | What it selects |
|---|---|
assignee = me() AND resolved is empty | my unresolved issues |
project in (PLT, MOB) AND type = bug AND created >= -7d | issues of the Error type in two projects created in the last week |
sprint in openSprints() AND status = "Testing" | issues of open sprints in the Testing status |
due < today() AND resolved is empty ORDER BY due | overdue issues, earliest due date first |
(priority >= high OR label = urgent) AND assignee is empty | important or urgent issues without an assignee |
NOT label is not empty | issues without labels |
Operators: = (equals), != (not equal), in (…) (one of), not in (…) (none of), ~ and !~ (contains and does not contain, for text fields), <, <=, >, >= (for dates, numbers and priority), is empty and is not empty (the field is empty or filled in). For priority, > means "higher than": priority >= high selects High, Critical and Blocking.
Fields:
| Field | Meaning | Field | Meaning |
|---|---|---|---|
project | project | key | issue key |
type | issue type | parent | parent issue |
status | status | text | title and description |
category | status category | title | title |
priority | priority | created | creation date |
assignee | assignee | updated | date of the last change |
reporter | reporter | resolved | resolution date |
watcher | watcher | due | due date |
sprint | sprint | start | start date |
label | label | points | estimate in points |
team | team | estimate | estimate in hours |
department | department | remaining | remaining hours |
resolution | resolution | spent | hours logged |
Dictionary values are given by code, key, login or name in any interface language: project = PLT, assignee = ivan, priority = high, status = "In Progress" (finds the In progress status whatever the interface language). A value that contains spaces is enclosed in quotes.
Functions: me() — you; openSprints(), futureSprints(), closedSprints() — open, planned and closed sprints; myTeams() — the teams you belong to; today(), startOfWeek(), endOfWeek(), startOfMonth(), endOfMonth(), startOfYear(), endOfYear() — dates. Dates are written as 2026-11-30 or 30.11.2026; an offset from today is written as -7d (7 days ago), +2w (in 2 weeks), -1m, -1y.
Hints while typing
While you type, a list of hints appears below the string: at the start of a condition it offers fields, after a field the operators allowed for it, after an operator the field's values from the dictionary, after a condition the connectives and sorting. The list also opens with Ctrl+Space. The arrow keys select a hint, Tab or Enter inserts it, Esc closes the list.
An error in the string is shown in red below it as you type, with the character position. If the string contains a value that does not exist (for example, a status that is not in the workflows), the message appears after you click Search; while there is an error, the issue list is empty.
Whatever the query string, it returns only issues of projects you have access to.
Query builder
The Builder button opens a window in which the query is assembled with the mouse; the query string changes immediately.
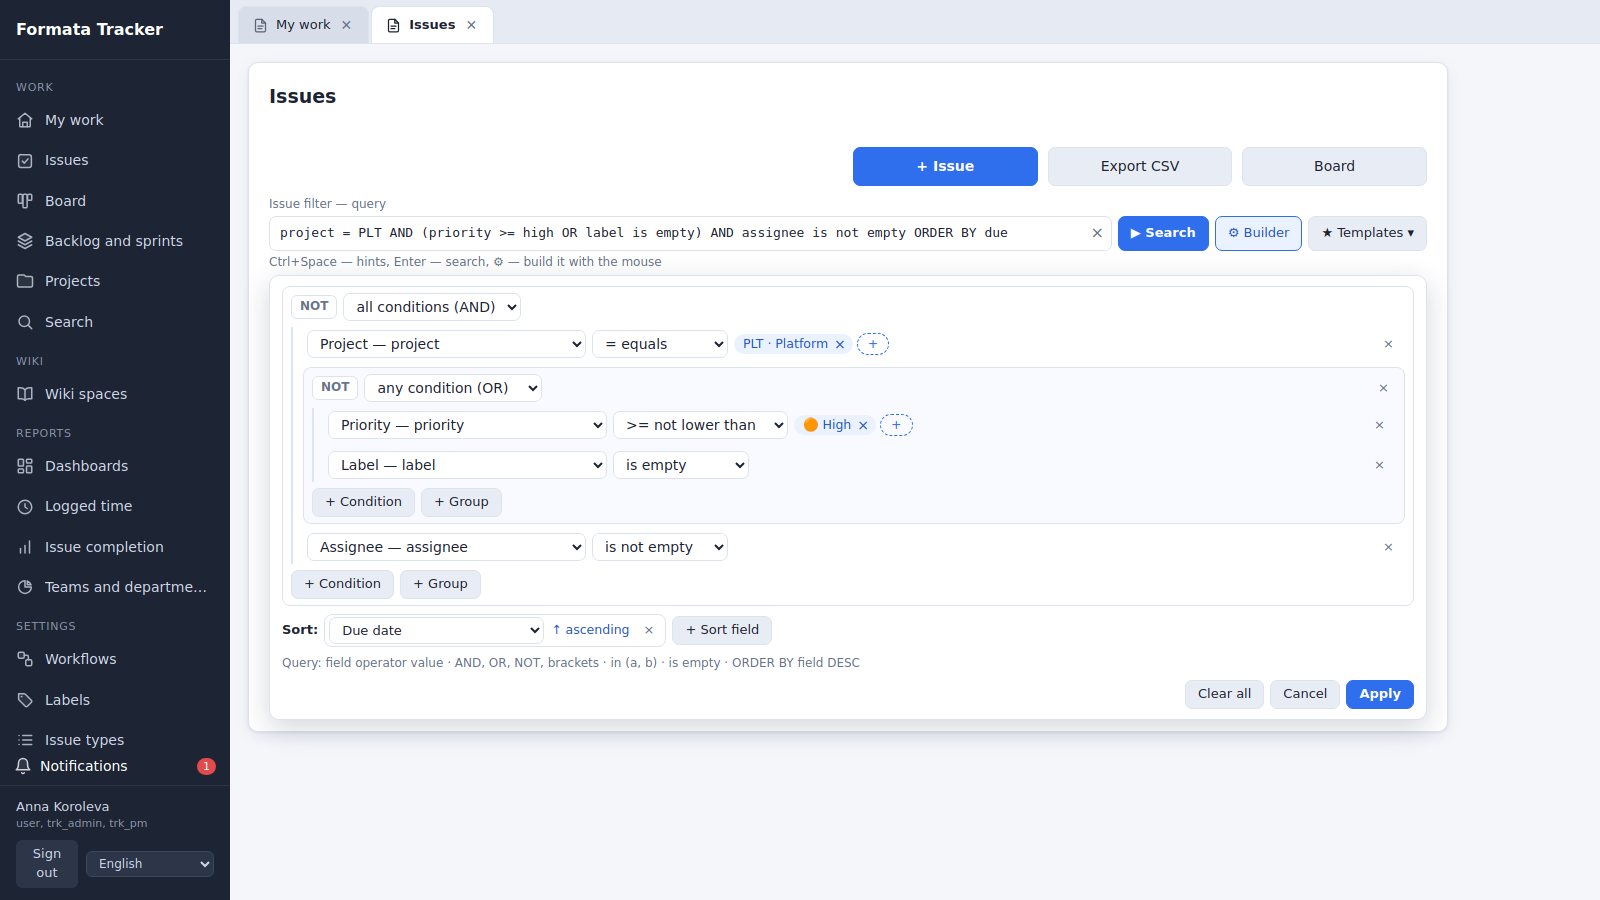
- A condition group joins its conditions as "all conditions (AND)" or "any condition (OR)". The NOT button of a group means that the conditions of the group must not hold.
- Condition: choose a field, an operator and a value. For dictionary fields the values are chosen from a list with search (the + pick button); when you choose a second value, "equals" becomes "one of". For dates you can enter a function or an offset, or pick a date in the calendar.
- + Condition and + Group add a condition or a nested group; × removes it.
- Sort: a field and a direction (ascending or descending).
- Apply runs the query and closes the window, Cancel restores the previous string, Clear all removes all conditions.
An incomplete condition is not added to the query string and is outlined with a dashed line.
Filter templates
The Templates button opens the list of templates: Mine (yours) and Shared (visible to everyone). Twelve shared templates are supplied: My open issues, My issues in progress, Created by me, Watching, Unassigned, Overdue, Due this week, In open sprints, Open bugs, Urgent: priority “High” and above, Done in the last 7 days, Changed today.
- Clicking a template puts its string into the query field and runs the query. The name of the current template is shown below the string, with the "modified" mark if the string has been changed.
- Save as a new template… saves the current string under a new name; the "shared — visible to everyone" option makes the template shared.
- Save changes to “…” writes the current string into the selected template.
- Your own templates offer Rename, a personal / shared switch and Delete. The supplied templates are changed by the tracker administrator.
In a shared template the me() function means whichever user runs it. Templates work in the issue list, in reports and in the dashboard settings.
The Export CSV button exports the issues selected by the current query string.
Creating an issue
The + Issue button opens a new card. The required fields are Name, Project and Type. Save the card with the Save button: the issue receives the project key and a number, and its status is the initial status of the project's workflow.
The issue card
The issue card contains:
- above the title, a trail of links to the project and the parent issues;
- the issue fields to the right of the description: project, type, priority, assignee, sprint, team, parent issue, labels, estimates, remaining time, logged time, dates, reporter;
- the description in rich text: headings, lists, tables, code, quotes, images (with a button, pasted from the clipboard or dragged in), and a link to a tracker document with the 📄 button;
- the buttons + Sub-task, ⏱ Log time, 💬 Comment, 🔗 Link, 👁 Watch / unwatch and Delete;
- further down, the steps by work type, sub-tasks, linked issues, Mentioned in, comments, attachments, development in Gitea, logged time, time in statuses and the change history.
Double-clicking a history line opens its details; for the title, the description and comments (marked with the 🔍 icon) a word-by-word "before — after" comparison of the text is shown: added text in green, removed text in red.
Moving an issue to another status
Choose a status in the Move to status field and click Transition. The list contains only the transitions that the workflow allows for your role. If a transition has conditions (a comment, an assignee, an estimate, logged time, closed sub-tasks, no blocking issues, completed steps, a resolution), the program tells you what is missing; the comment for the transition is entered in the Transition comment field and the resolution in the Resolution field. A transition can itself set the assignee, the resolution and the start date.
Steps by work type
The Steps by work type block has a tab for each work type (Development, Code review, Testing, Acceptance). The work type of the issue's current status opens first and is marked "now".
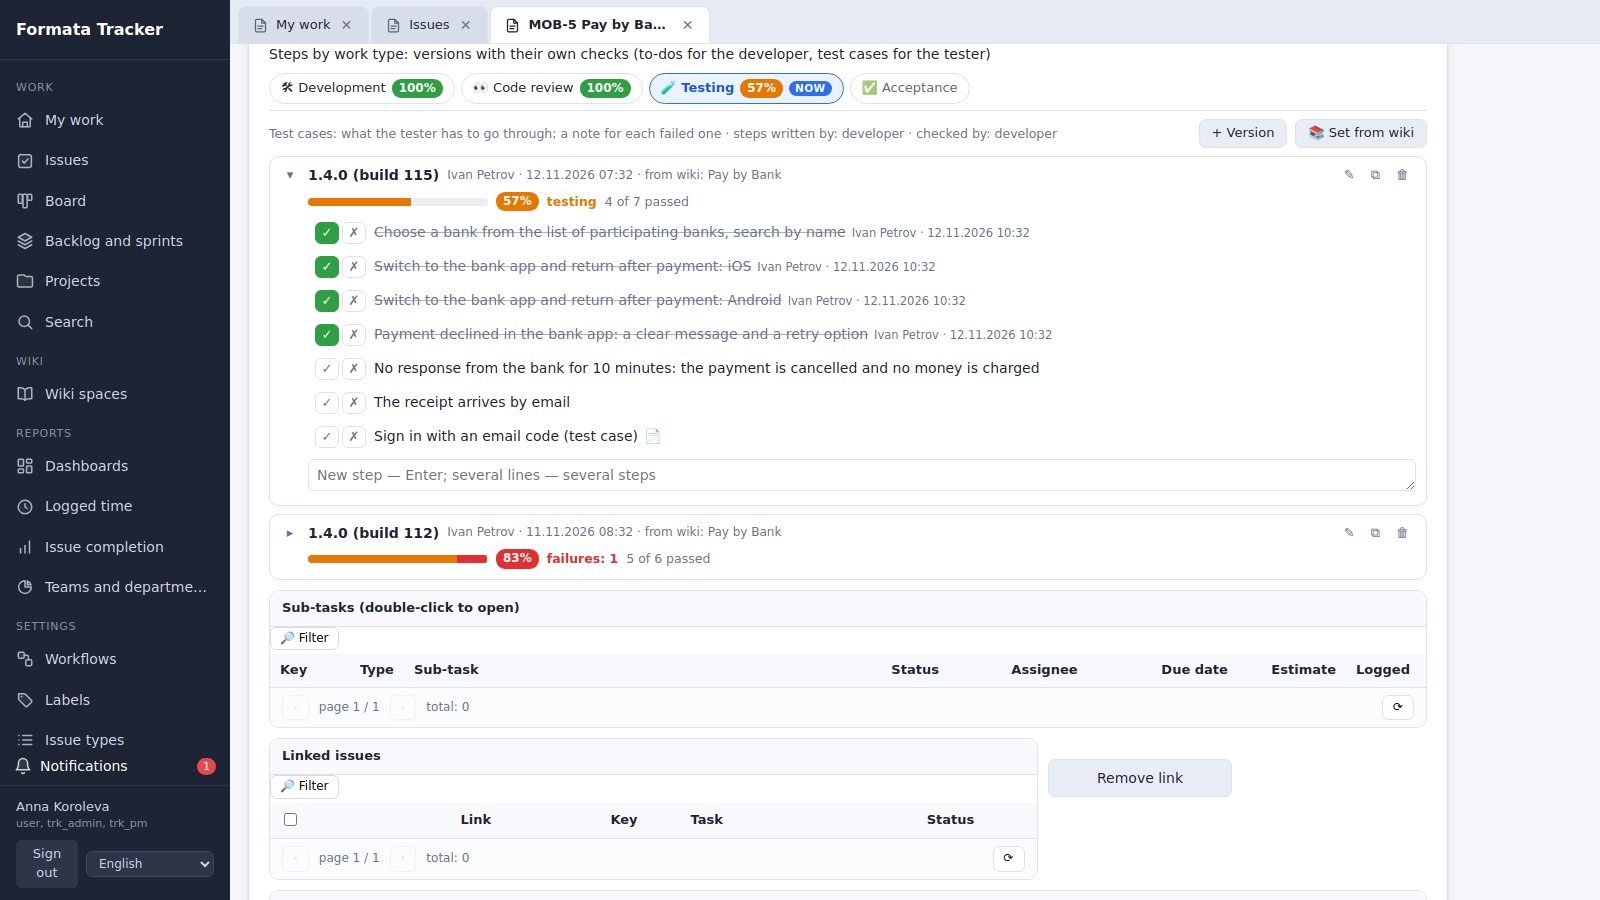
- + Version creates a version of steps with a heading (a build number or a title): empty, or with the steps of the previous version without checks, for a re-check.
- A new step is typed in the line at the bottom of the version and saved with Enter; several lines make several steps. Double-clicking a step edits it; dragging changes the order.
- The "to-dos" view has a checkbox for "done". The "test cases" view has the ✓ (Passed) and ✗ (Failed) buttons; a note is written for a failed step.
- Each version has an overall status: a progress bar, a percentage in colour (grey: not started; orange: less than half; yellow: more than half; green: all done; red: there are failed steps) and "N of M done".
- 📚 Set from wiki adds standard steps from the wiki space set for the work type: list items on its pages, or whole pages (test cases with a link).
Who writes the steps and who checks them off is set on the work type. Every change to the steps is recorded in the issue history.
Logging time and estimates
⏱ Log time opens a window: Date, How much (1h 30m, 1:30, 1.5, 90m, 1d, where a day equals your daily working hours), Remaining (optional; if it is left empty, the remaining time decreases by itself) and the What was done comment. You can delete your own time entries in the Logged time block of the card.
Comments and links
💬 Comment adds a comment in rich text; double-clicking your own comment opens it for editing or deletion. 🔗 Link links the issue to another one: blocks, linked to, duplicates, copy; the link is shown in both issues.
Board, backlog and sprints
Board
Board shows the project's issues in columns by the statuses of its workflow. Dragging a card to another column performs a status transition if it is allowed and its conditions are met. A card shows the priority colour, labels, key, assignee, due date and estimate. A column that holds more issues than its WIP limit is highlighted. Filters: project, sprint, and Whose: Mine or Unassigned.
Backlog and sprints
Backlog and sprints shows the project's issues without a sprint at the top. Select issues, choose a sprint and click → To selected sprint; ← Return to backlog moves the selected issues out of their sprints. + Sprint creates a sprint.
The sprint card (double-click a sprint row) shows the goal and dates, sprint progress, the burndown chart, time by employee, distribution by status and the issues of the sprint. The ▶ Start and ■ Close buttons are available to the project manager; when a sprint is closed, unfinished issues are moved to the chosen sprint or to the backlog.
Wiki
Wiki spaces shows the spaces available to you. A space contains a tree of pages; double-click a page to open it.
- Edit opens the page editor (the same as for an issue description). When saving you can state what changed; if another employee has changed the page in the meantime, the program offers to reopen it.
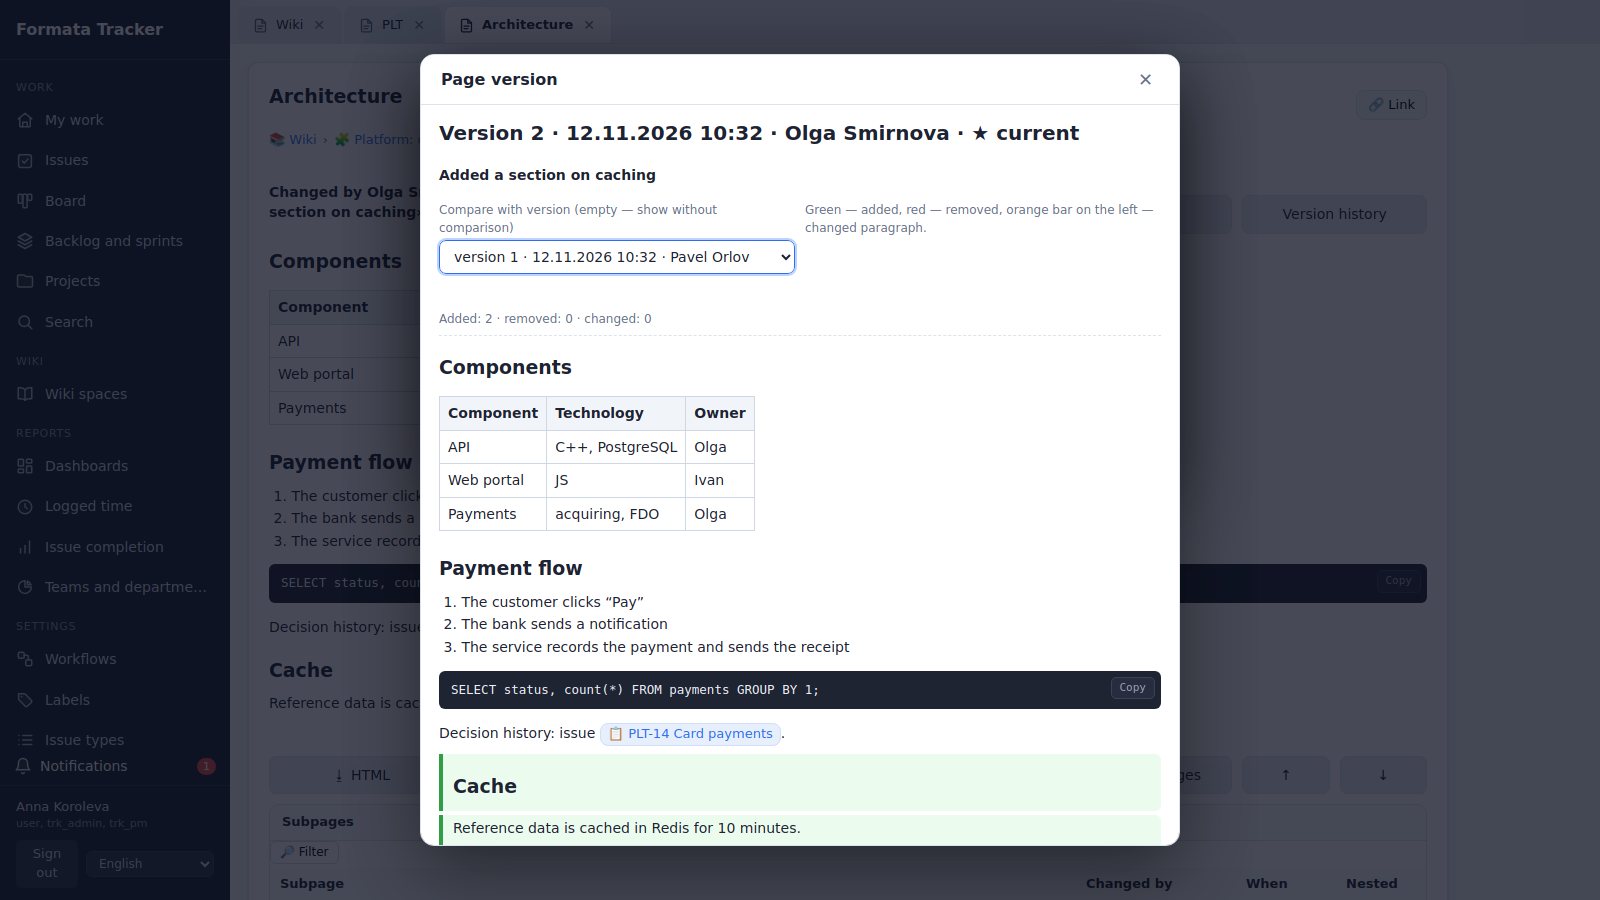
- Version history shows the versions of the page: author, time, comment, change in size. Double-click a version to open it; choose another version in the Compare with version field: added text is highlighted in green, removed text in red, and a changed paragraph is marked with an orange bar. Restore this version creates a new version with the content of the selected one.
- The export buttons save a page, a branch or a space as HTML, Markdown (an archive with images and attachments) or Word; Print / PDF opens a printable version.
Reports and dashboards
Reports
- Logged time: totals, time by employee, by day, and all entries for the period; if a sprint is selected, the period is taken from its dates. Export detailed CSV saves all entries.
- Issue completion: the number of issues, done, percentage, overdue, done late, estimates and logged time, a table by assignee and a list of overdue issues.
- Teams and departments: weekly charts of completed work in estimate points (an issue without an estimate counts as one point).
Each report has a query string above it: the report counts only the issues that the string selects (in the time report, the entries for those issues). The filters by project, sprint, team, department, employee and period apply together with the string.
Dashboards
Dashboards shows your own dashboards, shared ones and those made available to you. + Dashboard creates a new one.
In the dashboard settings you set the name, the visibility (personal or for everyone), filters for all panels (project, sprint, team, department, period, query string), the panels and their order, and access for employees, groups and teams (to view or to configure). A panel is one of 27 metrics shown as a number, a chart, a table, scales or a note, with a size and its own filters; a panel's own query string replaces the dashboard's string. A panel calculated with a query string is marked with the 🔎 icon.
Access rights and settings
Project roles
| Role | What it can do |
|---|---|
| Viewer | view the issues and wiki of the project |
| Reporter | create issues, comment, edit own issues |
| Developer | edit issues, make status transitions, log time |
| Manager | sprints, project settings, granting access |
Access to a project is granted in the project card to an employee, an access group or a team. The lead of a project always has the manager role in it. A closed project is visible only to those who have been granted access; an internal one is visible to all employees with the viewer role.
Wiki space roles: reader, editor, space administrator. Dashboard permissions: view or configure.
Tracker settings
The tracker administrator has access to Workflows (statuses, transitions, conditions, auto-actions, the workflow diagram and its check), Labels (groups and rules), Issue types, Work types and steps, Employees, Departments, Teams, Access groups and Link with Gitea. Project labels and the membership of their own team are configured by the project lead and the team lead.